Showing posts with label The Best Things in LIfe. Show all posts

Monday, December 22, 2014

Homemade Soap Season


I guess I could have said homemade soap season is nigh upon us but who says that anymore except those of us who watch period dramas and read old books? For me it's harder to make soap in the summer because the temperatures get too high unless you start early in the morning. It takes too long for the sodium hydroxide to cool to the proper temperature unless I use up all the ice the ice maker produces then there is none for iced tea. Fall weather is so spectacular I really just like being out and about and in the garden. Early in the spring is the traditional time to make soap, post holidays and pre-spring cleaning, before there is weeding and gardening to do. (Having just wrote that, I don't think we have winter in California anymore. I am still harvesting squash from the garden, some roses are blooming, not all the leaves are off the trees and the weeds are starting to take off!)

These soaps turned out very nice (except for the spots). I used sodium lactate (which is a sugar) to make the soap harder since my recipe is not that hard but apparently, I didn't mix it in enough or something. Still even with the spots I am very pleased. I have a couple of these types of tray molds and I never seem to get anything aesthetically pleasing from what I have tried until now. I don't want to "paint" the details in as some have done (I have seen beautiful painted soaps on the websites that are usually selling the molds). My basic recipe is not that opaque but I refuse to whiten it up with titanium dioxide which is toxic.

So here is what I did. I made a batch of soap. I kept out about an ounce of distilled water when I made the sodium hydroxide (I put red devil lye into the distilled water). Then I made a small amount of green (sage) and brown (java) coloring (making up with the 1 ounce of water I withheld from the main batch of sodium hydroxide). I use dedicated pyrex measuring cups for soap making so that I can control the pour easier. So after putting soap in the individual pyrex cups and mixing in the colors, I poured the brown colored soap into the pine cone and branch areas and green colored soap into the pine needle areas. Then I poured the uncolored soap into the tray mold. As I had more green colored soap, I finished off pouring that into the tray. I have done this technique before on other detailed tray molds but they didn't turn out to my satisfaction probably because the color combinations didn't blend together as naturally as these do.

After letting the mold sit and unmolding  (plus 4 weeks curing time for the lye and fats/oils to completely saponify) and voilá! I have always thought of these soaps as very Christmasy but I guess they could also be considered rustic or woodsy and be used year round especially at a cabin. It's so nice I don't want to use it just yet.

Saturday, October 16, 2010

Retailers pay attention!


Okay, I wasn't really sure what to name this post but I wanted to complain to the powers that be that they really need to design everyday, mundane objects with some sort of style even if we are in a recession. I have been looking, quite unsuccessfully, to buy sheets for a couple of years now. Everything I have seen is your basic blue, brown, green, white or off-white in the most awful shades. I thought it was just me so I mentioned to my friend recently how I had finally bought a new set of sheets after years of looking (the last bottom sheet had finally shredded) and she said the same thing. She finally had to buy a new set and settled on the least offensive color she could find which was off-white.

So, this is what I was lucky enough to find. I would buy another set and maybe even another in a different color, if they were available.  They are made of microfiber which is not as breatheable as cotton but I fell in love with the color and the Art Nouveau like pattern.  And, best of all, I bought them at a discount store for a mere $15. I love them!

Sunday, June 14, 2009

Saturday Still Life

Bouquets of flowers from the garden.

A mixed bouquet of hydrangeas, calla lillies and aglaia daisies.

These are cone flowers otherwise known as echinaceas from my garden.

I couldn't decide which photo I liked better. Plus, I just love these flowers.

Some more flowers and greenery from my garden as well as the first squash minus what has been already eaten (I did try some batter fried zucchini blossoms stuffed with mozzarella cheese with little zucchinis attached this afternoon-delicious!) . We also made some frutti di bosco jam as well as some pickled beets. I was lucky enough to find golden and chioggia beets at the farmers market on Saturday.
Posted by Picasa

Sunday, June 7, 2009

Viola

No, this isn't Provence but the Lavender Hollow Farms near Escalon, California. Some gardeners I know won't plant anything that isn't edible. However, I don't subscribe to that philosophy. The soul needs to see beauty.If the gardening muse in you needs order, straight rows of lavender will soothe the mind. In the early morning, the fragrance is also a sensory delight. I couldn't resist walking down the rows of lavender and trying not to disturb the bees hard at work.
Wouldn't you like a spot like this in your garden?

Ummm... Purple. I also bought some lovely lavender and grapefruit lotion, lavender butter cookies and a couple of plants. The cookies were delicious.

I love the color purple (viola in Italian and also the name of the soccer team in Florence, I like them, too.) I wish I had more space to grow lavender in my backyard but at least I won't have to go far for a fix.

Sunday, January 18, 2009

Probably not the last pillow post


This is a photo of an Etruscan youth's sarcophagus at the Vatican Museum. It doesn't look like he died peacefully. In fact, he looks to be in the throes of a painful death. My intuition tells me that he died as a result of a hunting accident. Maybe he was gored by a boar or a stag? His favorite (hunting) dog lies next to the bed while his head rests on, yes, a fringed pillow. This type of fringe is called bullion fringe. I used what is called brush fringe on the pillows I made. But, I am fascinated with who made this fringe in ancient Rome? Unfortunately, textiles rarely survive antiquity and we have to look elsewhere to see what they were like. Like on frescoes, tombs, sarcophaguses (sarcophagi?) and vases.

This probably isn't the last pillow post but I had to include it with the last two posts. As I have yet many pillows awaiting construction as soon as I find (enough of) the right fringe...

Fringed pillow finale

These are the pillow that I made for my sister. The fabric had a dominant symbol so I fussy cut it out to be centered in the front of the pillow.

After I had decided on the fabric dimensions, I had to sleep on how to cut the back of the pillow pieces. I didn't have enough fabric to match the pattern on the two cut pieces so I decided to reverse the pattern so that the two symbols "met".
This is how the back turned out. Not too bad.

The Pillow Project Trial Run

Several years ago (I say 2, my sister says it's more closer to 4 years), my sister wanted to have some custom made pillows from Calico Corners. They are a lovely, designer/decorator chain with fabulous upholstery fabrics and trims. They also do windows. However, as I am, I felt the price they wanted to make the pillows was excessive. So, I told my sister I would make them for her. I made the euro shams seen on the daybed in my many photos from sheets and piping and figured fringe wouldn't be too hard. (In a moment of madness, I had also decided to make two bridesmaids dresses for my sister's wedding when we could find nothing to satisfy ourselves. That is just the way we are.)

But, time went by, and I thought too excessively about making these particular pillows too perfect and they didn't get done. Until now. In order to get over the worry of having her pillows not turn out, I decided to make a trial run. So I had this western, tooled, leather-look fabric in my stash. Of course, I did a bit of Internet research and turned up a lovely rug-hooking blog that had posted about making fringed pillows.

So, here is my post about making fringed pillows. I make my pillows sort of like an envelope, so the pillow can be removed and the cover cleaned, if necessary. (Gene, of the rug hooking blog, sewed his pillow into the cover.) So then I had to think about what size to cut the fabric. My sister had bought 18" pillows that were pretty stuffed. I had to think about the size of the overlap on the back of the pillow and how many layers of fabric I would be sewing through and if my sewing machine was going to be able to do it. I decided on allowing 1-inch for the seem, but because the pillows were so stuffed, to allow 2 inches more for that. So, I cut out a 21-inch square.

I knew that I wanted the two pieces of the back to overlap by 4 inches plus 1 inch for turning over the edge so I cut a piece of fabric 26" (21 + 5) by 21". Then I cut it in half so I had two pieces 13" by 21".

Next, attach fringe. I bought the kind that is meant to be sewn between the layers. The white string holds the fringe together until you pull it off. Don't do this until you are completely finished with the pillow.

Start the fringe on the bottom of the right side of the fabric. Usually, the fabric store will put a piece of tape of the fringe to keep it from fraying. See the paired loop in the photo below? I sew through it then carefully separating the fringed "pairs", I cut through it and the string on the bottom holding the fringe together (Then cut off the taped fringe. I don't want sticky stuff gumming anything up). Then, I zig-zag the loops at the top, to make sure it is held together. Pin the fringe to the right side of the fabric then overlap the fringe a couple of inches. Repeat the steps above before you cut off any excess fringe. If you want the pillows extra fringy, you can double the fringe all the way around the pillow but it gets pretty spendy. Try to sew the fringe to the fabric at the end of the looped ends as close to the loosened threads as possible. (If any fringe threads are loose, smooth them out flat so you don't sew them into the seam.) You don't want to see the bound threads when you turn the pillows inside out. But if you do, it is easy to fix. Just turn the pillows back inside and re-sew a little closer to the edge. That is why you want to wait until you are satisfied with the pillows before pulling the thread holding the fringe together.
Then, sew on the back pieces, right sides together one at a time with the folded over edge in the middle of the pillow. I usually reinforce the openings by sewing over a couple of times. Trim the excess fabric at the corners ( I didn't do this on my sister's pillows fabric because it was a loose weave and I had zig-zagged the edges). Turn the pillows inside out especially at the corners to make sure the bound fringe is not showing.
And there you go, easy, peasy pillows!

Saturday, February 9, 2008

Chocolate croissants

For a while, my sister and I were on a mission to find decent croissants somewhere in a 200-mile radius of where we live here in California. They were just too hard to make and didn't turn out like the real (code: like they taste in France) croissants. We went to bakeries in Pleasanton, Walnut Creek, San Francisco and even incorporated bakeries into a trip we took to Los Angeles to see the King Tut Exhibit a few years back. Then we gave up. Because, a) we were puttin' on weight going to all those bakeries and b) the croissants just weren't even close to what real croissants are supposed to taste like. Oh yeah, and we even lowered our standards. But, we had to draw the line somewhere. Croissants should be flaky and not like bread. But low and behold, one day I received a mail circular from Trader Joe's advertising frozen chocolate croissants.

There is only on catch. They must proof or rise for 9 hours. Which means before you go to bed if you want to have fresh croissants in the morning. They look like this in the evening.

Then they look like this the next morning. Brush on a little egg wash.

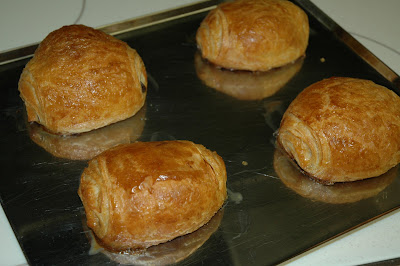
Then voila. Chocolate croissants. Okay, they are not exactly like french croissants but its been awhile since I've been there but it is the closest I'm getting to a real croissant until I do.
And, don't even get me started on what real Danish pastry tastes like.